Topology – Part 1 (FTP)

Part 1 will highlight a TCP capture of an FTP session. This topology consists of the CyberOps Workstation VM with Internet access.
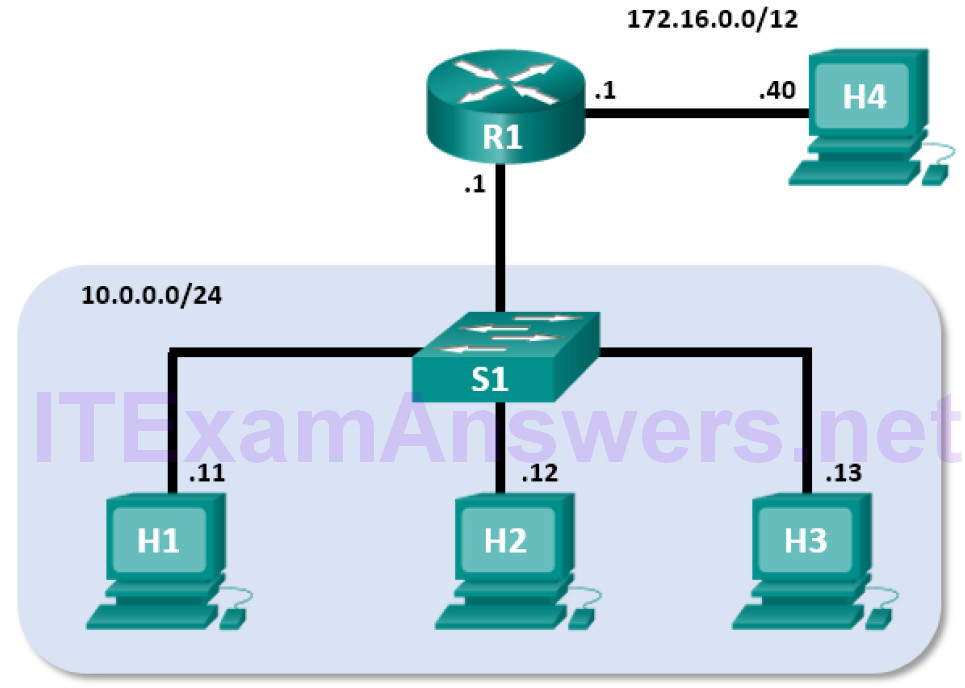
Mininet Topology – Part 2 (TFTP)
Part 2 will highlight a UDP capture of a TFTP session using the hosts in Mininet.
Objectives
- Part 1: Identify TCP Header Fields and Operation Using a Wireshark FTP Session Capture
- Part 2: Identify UDP Header Fields and Operation Using a Wireshark TFTP Session Capture
Background / Scenario
Two protocols in the TCP/IP transport layer are TCP (defined in RFC 761) and UDP (defined in RFC 768).
Both protocols support upper-layer protocol communication. For example, TCP is used to provide transport layer support for the HyperText Transfer Protocol (HTTP) and FTP protocols, among others. UDP provides transport layer support for the Domain Name System (DNS) and TFTP, among others.
In Part 1 of this lab, you will use the Wireshark open source tool to capture and analyze TCP protocol header fields for FTP file transfers between the host computer and an anonymous FTP server. The terminal command line is used to connect to an anonymous FTP server and download a file. In Part 2 of this lab, you will use Wireshark to capture and analyze UDP header fields for TFTP file transfers between two Mininet host computers.
Required Resources
- CyberOps Workstation VM
- Internet access
Part 1: Identify TCP Header Fields and Operation Using a Wireshark FTP Session Capture
In Part 1, you use Wireshark to capture an FTP session and inspect TCP header fields.
Step 1: Start a Wireshark capture.
a. Start and log into the CyberOps Workstation VM. Open a terminal window and start Wireshark. Enter the password cyberops and click OK when prompted.
[analyst@secOps ~]$ sudo wireshark-gtk
b. Start a Wireshark capture for the enp0s3 interface.
c. Open another terminal window to access an external ftp site. Enter ftp ftp.cdc.gov at the prompt. Log into the FTP site for Centers for Disease Control and Prevention (CDC) with user anonymous and no password.
[analyst@secOps ~]$ ftp ftp.cdc.gov
Connected to ftp.cdc.gov.
220 Microsoft FTP Service
Name (ftp.cdc.gov:analyst): anonymous
331 Anonymous access allowed, send identity (e-mail name) as password.
Password:
230 User logged in.
Remote system type is Windows_NT.
ftp>
Step 2: Download the Readme file.
a. Locate and download the Readme file by entering the ls command to list the files.
ftp> ls
200 PORT command successful.
125 Data connection already open; Transfer starting.
-rwxrwxrwx   1 owner    group             128 May  9  1995 .change.dir
-rwxrwxrwx   1 owner    group             107 May  9  1995 .message
drwxrwxrwx   1 owner    group               0 Feb  2 11:21 pub
-rwxrwxrwx   1 owner    group            1428 May 13  1999 Readme
-rwxrwxrwx   1 owner    group             383 May 13  1999 Siteinfo
-rwxrwxrwx   1 owner    group               0 May 17  2005 up.htm
drwxrwxrwx   1 owner    group               0 May 20  2010 w3c
-rwxrwxrwx   1 owner    group             202 Sep 22  1998 welcome.msg
226 Transfer complete.
Note: You may receive the following message:
421 Service not available, remote server has closed connection
ftp: No control connection for command
If this happens, then the FTP server is currently down. However, you can proceed with the rest of the lab analyzing those packets that you were able to capture and reading along for packets you didn’t capture.
You can also return to the lab later to see if the FTP server is back up.
b. Enter the command get Readme to download the file. When the download is complete, enter the command quit to exit.
ftp> get Readme
200 PORT command successful.
125 Data connection already open; Transfer starting.
WARNING! 36 bare linefeeds received in ASCII mode
File may not have transferred correctly.
226 Transfer complete.
1428 bytes received in 0.056 seconds (24.9 kbytes/s)
c. After the transfer is complete, enter quit to exit ftp.
Step 3: Stop the Wireshark capture.
Step 4: View the Wireshark main window.
Wireshark captured many packets during the FTP session to ftp.cdc.gov. To limit the amount of data for analysis, apply the filter tcp and ip.addr == 198.246.117.106 and click Apply.
Note: The IP address, 198.246.117.106, is the address for ftp.cdc.gov at the time this lab was created. The IP address may be different for you. If so, look for the first TCP packet that started the 3-way handshake with ftp.cdc.gov. The destination IP address is the IP address you should use for your filter.
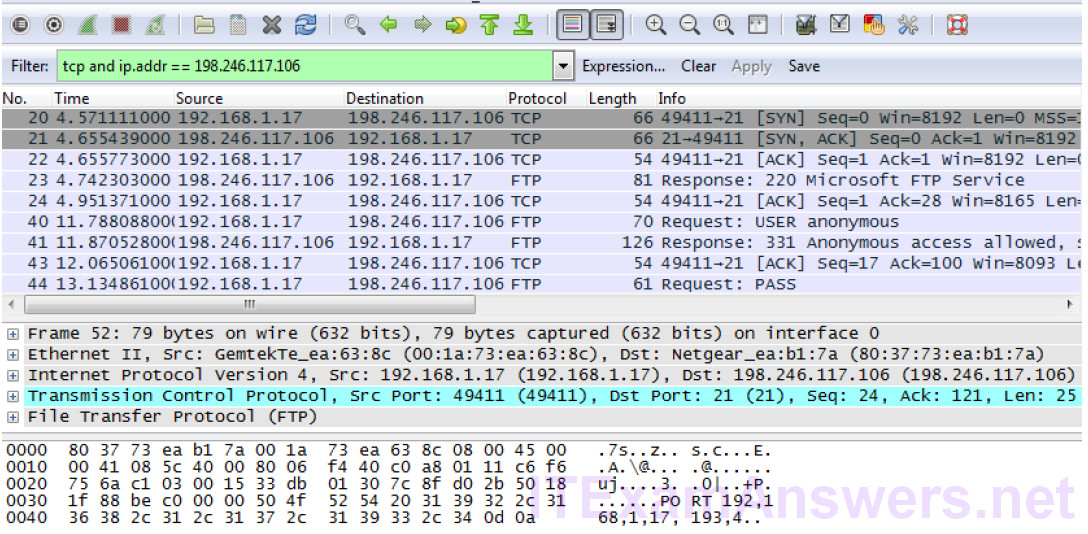
Note: Your Wireshark interface may look slightly different than the above image.
Step 5: Analyze the TCP fields.
After the TCP filter has been applied, the first three packets (top section) display the the sequence of [SYN], [SYN, ACK], and [ACK] which is the TCP three-way handshake.

TCP is routinely used during a session to control datagram delivery, verify datagram arrival, and manage window size. For each data exchange between the FTP client and FTP server, a new TCP session is started. At the conclusion of the data transfer, the TCP session is closed. When the FTP session is finished, TCP performs an orderly shutdown and termination.
In Wireshark, detailed TCP information is available in the packet details pane (middle section). Highlight the first TCP datagram from the host computer, and expand portions of the TCP datagram as shown below.
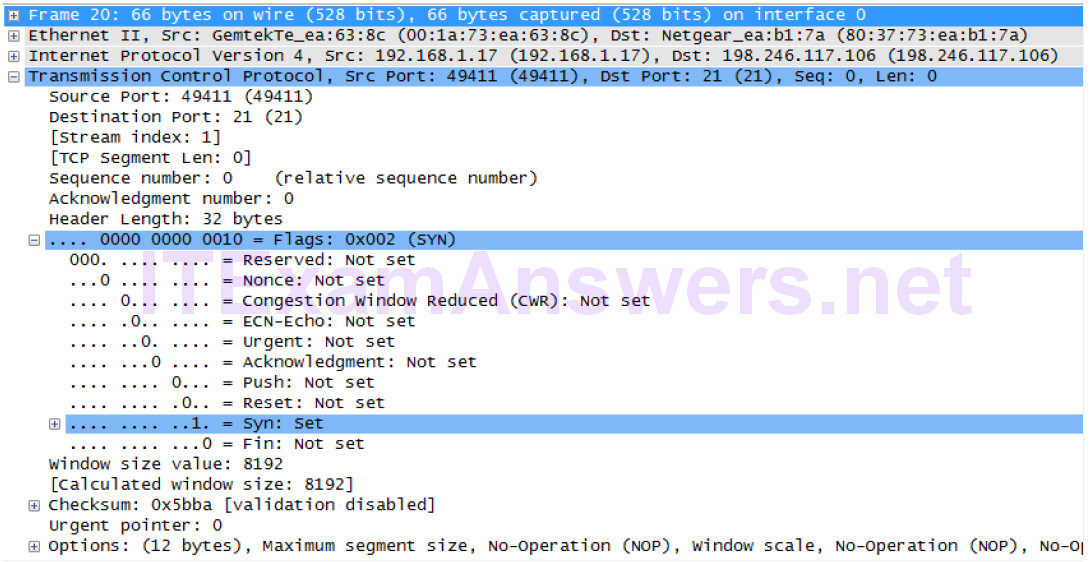
The expanded TCP datagram appears similar to the packet detail pane shown below.
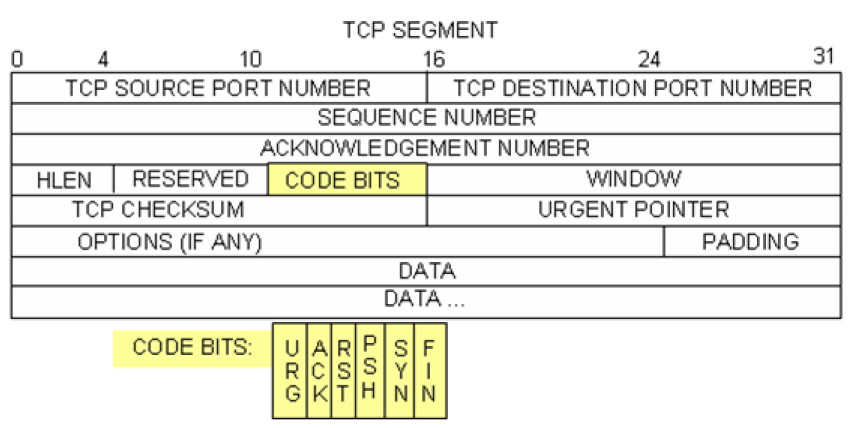
The image above is a TCP datagram diagram. An explanation of each field is provided for reference:
- The TCP source port number belongs to the TCP session host that opened a connection. The value is normally a random value above 1,023.
- The TCP destination port number is used to identify the upper layer protocol or application on the remote site. The values in the range 0–1,023 represent the “well-known ports” and are associated with popular services and applications (as described in RFC 1700), such as Telnet, FTP, and HTTP. The combination of the source IP address, source port, destination IP address, and destination port uniquely identifies the session to the sender and receiver.
Note: In the Wireshark capture above, the destination port is 21, which is FTP. FTP servers listen on port 21 for FTP client connections.
- The Sequence number specifies the number of the last octet in a segment.
- The Acknowledgment number specifies the next octet expected by the receiver.
- The Code bits have a special meaning in session management and in the treatment of segments.
Among interesting values are:
– ACK — Acknowledgment of a segment receipt.
– SYN — Synchronize, only set when a new TCP session is negotiated during the TCP three-way handshake.
– FIN — Finish, the request to close the TCP session.
- The Window size is the value of the sliding window. It determines how many octets can be sent before waiting for an acknowledgment.
- The Urgent pointer is only used with an Urgent (URG) flag when the sender needs to send urgent data to the receiver.
- The Options has only one option currently, and it is defined as the maximum TCP segment size (optional value).
Using the Wireshark capture of the first TCP session startup (SYN bit set to 1), fill in information about the TCP header. Some fields may not apply to this packet.
From the VM to CDC server (only the SYN bit is set to 1):
| Source IP address | 192.168.1.17* |
| Destination IP address | 198.246.117.106 |
| Source port number | 49411* |
| Destination port number | 21 |
| Sequence number | 0 (relative) |
| Acknowledgment number | Not applicable for this capture |
| Header length | 32 bytes |
| Window size | 8192 |
*Student answers will vary.
In the second Wireshark filtered capture, the CDC FTP server acknowledges the request from the VM. Note the values of the SYN and ACK bits.
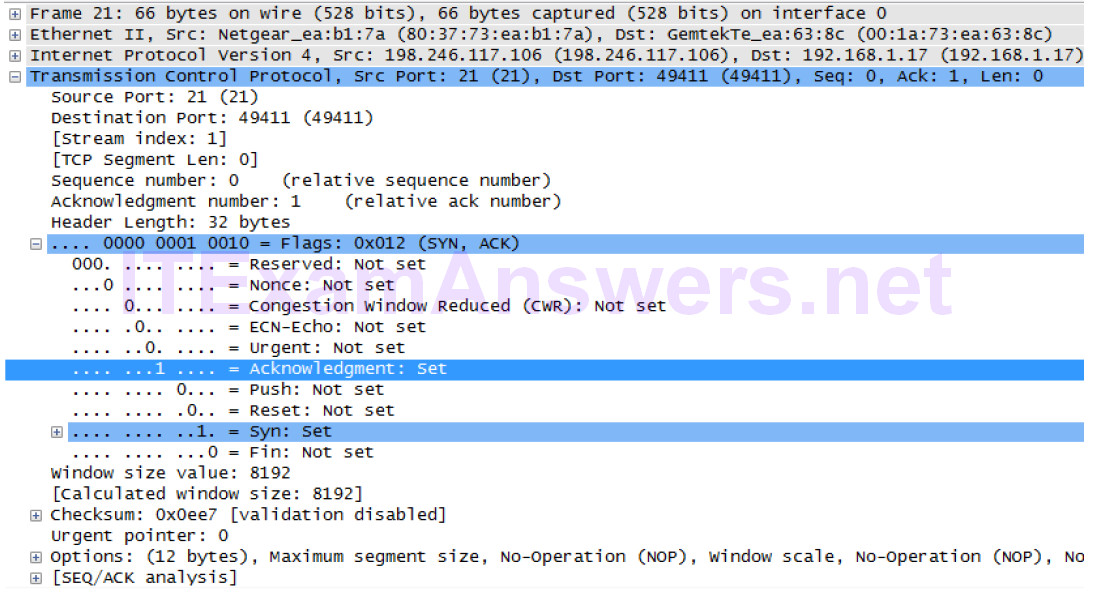
Fill in the following information regarding the SYN-ACK message.
| Source IP address | 198.246.117.106 |
| Destination IP address | 192.168.1.17* |
| Source port number | 21 |
| Destination port number | 49411* |
| Sequence number | 0 (relative) |
| Acknowledgment number | 1 (relative) |
| Header length | 32 bytes |
| Window size | 8192 |
*Student answers will vary.
In the final stage of the negotiation to establish communications, the VM sends an acknowledgment message to the server. Notice that only the ACK bit is set to 1, and the Sequence number has been incremented to 1.
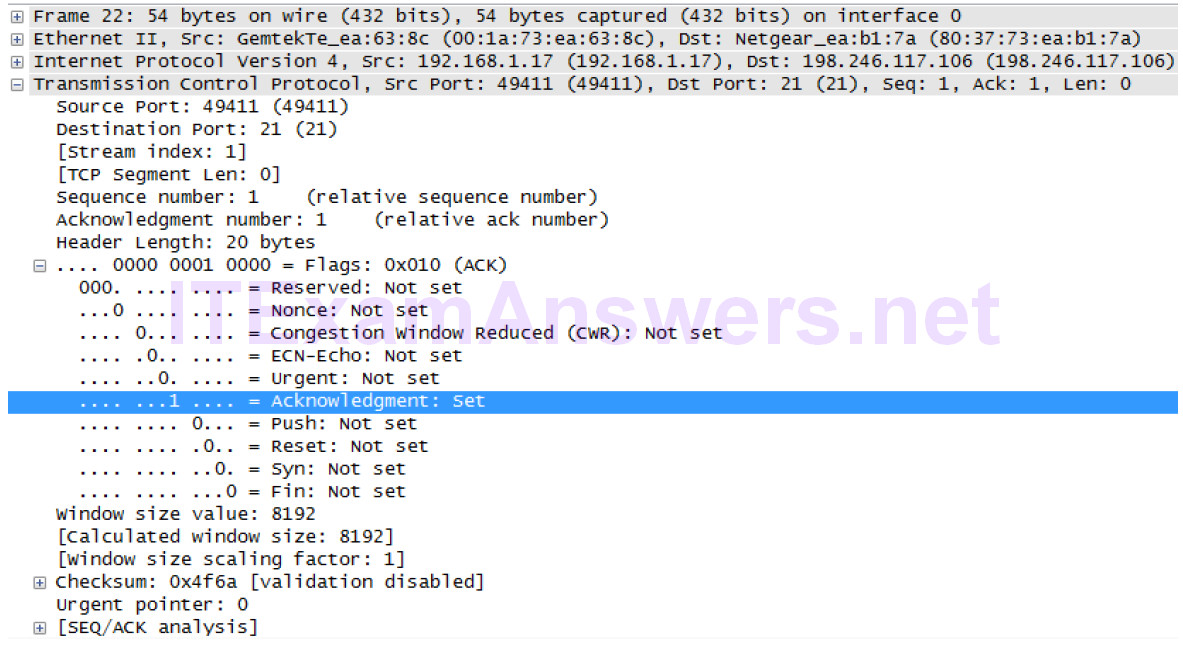
Fill in the following information regarding the ACK message.
| Source IP address | 192.168.1.17* |
| Destination IP address | 198/246/112/54 |
| Source port number | 49411* |
| Destination port number | 21 |
| Sequence number | 1 (relative) |
| Acknowledgment number | 1 (relative) |
| Header length | 20 |
| Window size | 8192* |
*Student answers will vary.
How many other TCP datagrams contained a SYN bit?
One. The first packet sent by the host at the beginning of a TCP session.
After a TCP session is established, FTP traffic can occur between the PC and FTP server. The FTP client and server communicate with each other, unaware that TCP has control and management over the session.
When the FTP server sends a Response: 220 to the FTP client, the TCP session on the FTP client sends an acknowledgment to the TCP session on the server. This sequence is visible in the Wireshark capture below.

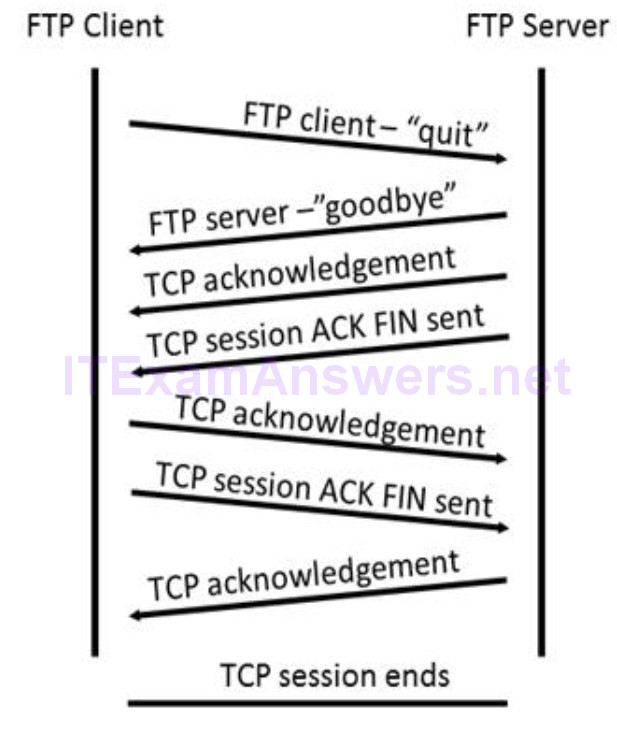
When the FTP session has finished, the FTP client sends a command to “quit”. The FTP server acknowledges the FTP termination with a Response: 221 Goodbye. At this time, the FTP server TCP session sends a TCP datagram to the FTP client, announcing the termination of the TCP session. The FTP client TCP session acknowledges receipt of the termination datagram, then sends its own TCP session termination.
When the originator of the TCP termination (the FTP server) receives a duplicate termination, an ACK datagram is sent to acknowledge the termination and the TCP session is closed. This sequence is visible in the diagram and capture below.
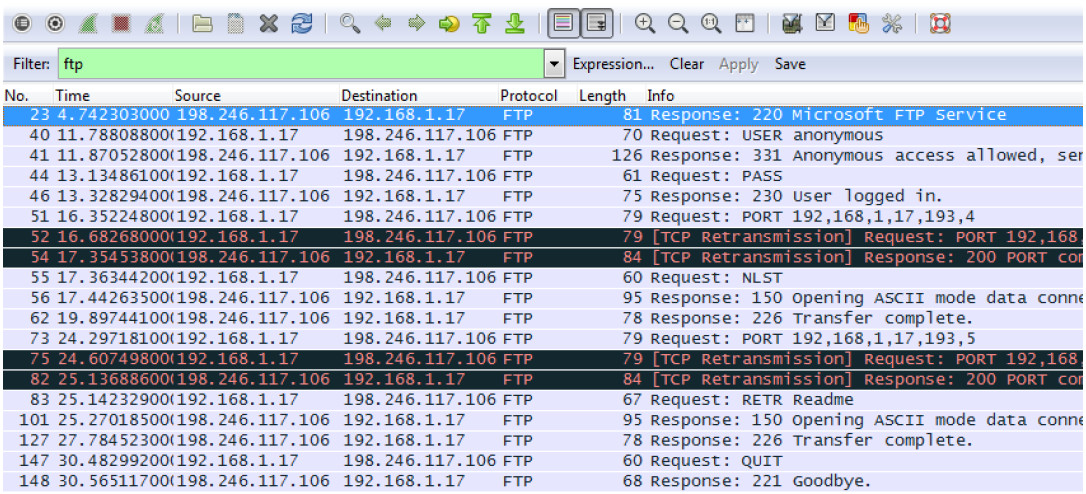
By applying an ftp filter, the entire sequence of the FTP traffic can be examined in Wireshark. Notice the sequence of the events during this FTP session. The username anonymous was used to retrieve the Readme file. After the file transfer completed, the user ended the FTP session.
Apply the TCP filter again in Wireshark to examine the termination of the TCP session. Four packets are transmitted for the termination of the TCP session. Because TCP connection is full-duplex, each direction must terminate independently. Examine the source and destination addresses.
In this example, the FTP server has no more data to send in the stream. It sends a segment with the FIN flag set in frame 149. The PC sends an ACK to acknowledge the receipt of the FIN to terminate the session from the server to the client in frame 150.
In frame 151, the PC sends a FIN to the FTP server to terminate the TCP session. The FTP server responds with an ACK to acknowledge the FIN from the PC in frame 152. Now the TCP session is terminated between the FTP server and PC.

Part 2: Identify UDP Header Fields and Operation Using a Wireshark TFTP Session Capture
In Part 2, you use Wireshark to capture a TFTP session and inspect the UDP header fields.
Step 1: Start Mininet and tftpd service.
a. Start Mininet. Enter cyberops as the password when prompted.
[analyst@secOps ~]$ sudo lab.support.files/scripts/cyberops_topo.py
[sudo] password for analyst:
b. Start H1 and H2 at the mininet> prompt.
*** Starting CLI:
mininet> xterm H1 H2
c. In the H1 terminal window, start the tftpd server using the provided script.
[root@secOps analyst]# /home/analyst/lab.support.files/scripts/start_tftpd.sh
[root@secOps analyst]#
Step 2: Create a file for tftp transfer.
a. Create a text file at the H1 terminal prompt in the /srv/tftp/ folder.
[root@secOps analyst]# echo "This file contains my tftp data." >
/srv/tftp/my_tftp_data
b. Verify that the file has been created with the desired data in the folder.
[root@secOps analyst]# cat /srv/tftp/my_tftp_data
This file contains my tftp data.
c. Because of the security measure for this particular tftp server, the name of the receiving file needs to exist already. On H2, create a file named my_tftp_data.
[root@secOps analyst]# touch my_tftp_data
Step 3: Capture a TFTP session in Wireshark
a. Start Wireshark in H1.
[root@secOps analyst]# wireshark-gtk &
b. From the Edit menu, choose Preferences and click the arrow to expand Protocols. Scroll down and select UDP. Click the Validate the UDP checksum if possible check box and click Apply. Then click OK.

c. Start a Wireshark capture on the interface H1-eth0.
d. Start a tftp session from H2 to the tftp server on H1 and get the file my_tftp_data.
[root@secOps analyst]# tftp 10.0.0.11 -c get my_tftp_data
e. Stop the Wireshark capture. Set the filter to tftp and click Apply. Use the three TFTP packets to fill in the table and answer the questions in the rest of this lab.

Detailed UDP information is available in the Wireshark packet details pane. Highlight the first UDP datagram from the host computer and move the mouse pointer to the packet details pane. It may be necessary to adjust the packet details pane and expand the UDP record by clicking the protocol expand box. The expanded UDP datagram should look similar to the diagram below.

The figure below is a UDP datagram diagram. Header information is sparse, compared to the TCP datagram. Similar to TCP, each UDP datagram is identified by the UDP source port and UDP destination port.

Using the Wireshark capture of the first UDP datagram, fill in information about the UDP header. The checksum value is a hexadecimal (base 16) value, denoted by the preceding 0x code:
| Source IP address | 10.0.0.12 |
| Destination IP address | 10.0.0.11 |
| Source port number | 47844 |
| Destination port number | 69 |
| UDP message length | 32 bytes* |
| UDP checksum | 0x2029 [correct]* |
*Student answers will vary.
How does UDP verify datagram integrity?
A checksum is sent in the UDP datagram, and the datagram checksum value is recomputed upon receipt. If the computed checksum is identical to the sent checksum, then the UDP datagram is assumed to be complete.
Examine the first frame returned from the tftpd server. Fill in the information about the UDP header:
| Source IP address | 10.0.0.11 |
| Destination IP address | 10.0.0.12 |
| Source port number | 58047* |
| Destination port number | 47844* |
| UDP message length | 46 bytes* |
| UDP checksum | Checksum: 0x1456 [incorrect, should be 0x8cce (maybe caused by “UDP checksum offload”?)]* |
*Student answers will vary.
Notice that the return UDP datagram has a different UDP source port, but this source port is used for the remainder of the TFTP transfer. Because there is no reliable connection, only the original source port used to begin the TFTP session is used to maintain the TFTP transfer.
Also, notice that the UDP Checksum is incorrect. This is most likely caused by UDP checksum offload.
You can learn more about why this happens by searching for “UDP checksum offload”.
Step 4: Clean up
In this step, you will shut down and clean up Mininet.
a. In the terminal that started Mininet, enter quit at the prompt.
mininet> quit
b. At the prompt, enter sudo mn – c to clean up the processes started by Mininet.
[analyst@secOps ~]$ sudo mn -c
Reflection
This lab provided the opportunity to analyze TCP and UDP protocol operations from captured FTP and TFTP sessions. How does TCP manage communication differently than UDP?
TCP manages communication much differently than UDP because reliability and guaranteed delivery requires additional control over the communication channel. UDP has less overhead and control, and the upper-layer protocol must provide some type of acknowledgment control. Both protocols, however, transport data between clients and servers using application layer protocols and are appropriate for the upper-layer protocol each supports.
