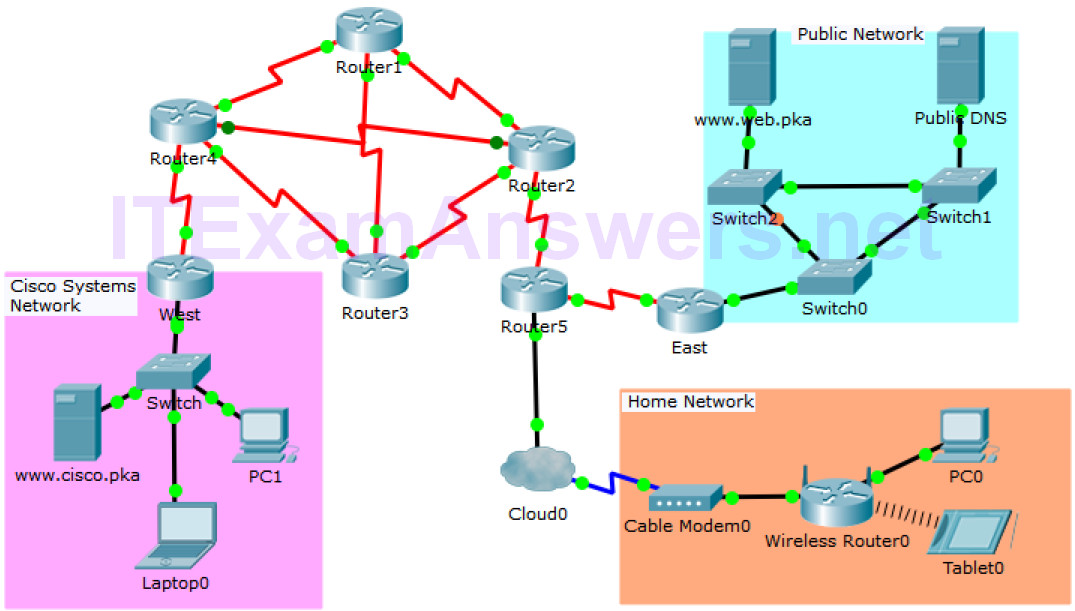
Topology

Objectives
In this activity, you will observe packet flow in a LAN and WAN topology. You will also observe how the packet flow path may change when there is a change in the network topology.
- Part 1: Verify Connectivity
- Part 2: Remote LAN Network Topology
- Part 3: WAN Network Topology
Background / Scenario
Packet Tracer allows the design and creation of a simulated networking topology. In this activity, you are presented with a simplified topology to observe packet flow. You will explore how packets travel through the network using the simulation mode in Packet Tracer. You will also observe the changes in packet flow when there is a change in the network topology.
Required Resources
- Latest version of Packet Tracer installed
Part 1: Verifying Connectivity
In this part, you will verify that you can access the other networks from devices on the Home Network.
a. Click PC0. Select the Desktop tab and open the Web Browser.
b. In the URL field, enter www.cisco.pka and press Go. Be sure to use the .pka domain, not the .com domain. It should be successful. You can click Fast Forward Time to speed up the process.
c. Repeat this for www.web.pka. It should be successful.
d. Exit the web browser when finished.
Part 2: Remote LAN Network Topology
In this part, you will use the simulation mode in Packet Tracer to observe how packets flow through a remote LAN network.
a. Switch to Simulation mode (Shift + S). Click Show All/None to clear all the selected event list filters.
b. Click Edit Filters. Select DNS under the IPv4 tab and HTTP under Misc tab.
c. Open a web browser on PC0. Enter www.web.pka and press Go.
Predict the packet path to resolve www.web.pka to an IP address. Record your prediction. ____________________________________________________________________
d. Click Capture / Forward until the webpage is displayed on PC0 to view the packet flow. Click View Previous Events when prompted by the Buffer Full dialog box.
After the IP address has been resolved, which path did HTTP packets travel to display the webpage?
Record your observations. ______________________________________________________________________
e. Switch to Real time mode (Shift + R). Click the X icon in the right tool panel to select the Delete tool.
Remove the link between Switch0 and Switch 1 from the Public Network to simulate a broken link. After 30 seconds, the network will learn of the broken link. You can click Fast Forward to speed up the process.
f. Select the Arrow tool above the Delete tool to de-select Delete.
g. Switch to Simulation mode (Shift + S). Open a web browser in Tablet0 and navigate to www.web.pka. You can click Auto Capture/Play to have Packet Tracer forward the packets without your interaction. You can also move the Play Slider to the right to speed up the packet forwarding.
h. With a broken link in the LAN, how did the path change? Record your observation. ___________________________________________________________________
Part 3: WAN Network Topology
Step 1: PC0 to websites.
a. Remaining in Simulation mode, open a web browser on PC0. Enter www.cisco.pka and press Go.
Predict the packet path to resolve www.cisco.pka to an IP address. Record your prediction. _____________________________________________________________________
b. Click Capture / Forward until the webpage is displayed on PC0 to view the packet flow. Click View Previous Events when prompted by the Buffer Full dialog box.
After the IP address has been resolved, which path did HTTP packets travel to display the webpage?
Record your observations. _____________________________________________________________________
c. Switch to Real time mode (Shift + R). Remove the link between Router4 and Router2 from the topology to simulate an inaccessible path. The routers are using Enhanced Interior Gateway Routing Protocol (EIGRP) to dynamically adjust routing tables to account for the deleted link.
d. Switch to Simulation mode (Shift + S). Open a web browser in Tablet0 and navigate to www.cisco.pka.
e. With a broken link in the WAN, how would the path change? Record your observation. _____________________________________________________________________
f. Switch to Real time mode (Shift + R).
Step 2: PC1 to websites.
a. Click PC1 > Desktop and open a command prompt.
b. Enter tracert www.web.pka at the command.
PC> tracert www.web.pka
c. Match the IP addresses in the tracert results to the devices in the topology. Hover over the routers in the topology to view the IP addresses of the interfaces on the routers. If the popup does not stay active long enough, you can access router IP addresses in the following manner: Click the router > CLI > press Enter. Now enter the command show ip interface brief to getting a listing of the interfaces and IP addresses.
| Trace Number | Device | Interface | IP Address |
|---|---|---|---|
| 6 | East | Serial 0/0/0 | 209.165.202.130 |
| 7 | www.web.pka | NIC | 209.165.202.132 / 192.168.2.254 |
Network address translation (NAT) is used to translate the private www.web.pka IP address of 192.168.2.254 to a routable IPv4 address of 209.165.202.132. In the tracert result, the first line of IPv4 address of 209.165.202.132 is for the G0/1 interface of East. The second line of IPv4 address of 209.165.202.132 displays the public IPv4 address of the web server.
d. Switch to Simulation mode (Shift + S). Open the web browser on PC1 and enter www.web.pka as the URL. Click Go.
e. Click Capture / Forward to load the web page.
f. Compare the tracert results to the simulation results for the HTTP packets. Record your observations. ____________________________________________________________________
